mount nfs on windows 10

在 Windows 10 上挂载 nfs

环境

  • nfs server: Linux(Centos 7)
  • nfs client: Windows 10

准备工作

  • nfs server 已经部署好
  • 挂载后可能没有修改目录的权限,这是因为 GID 和 UID 设置不对,详见 http://dovidenko.com/2017/505/nfs-centos-7-windows-10-network-shares.html
  • 运行「命令提示符」时要以管理员权限运行

Windows 10 上的配置步骤

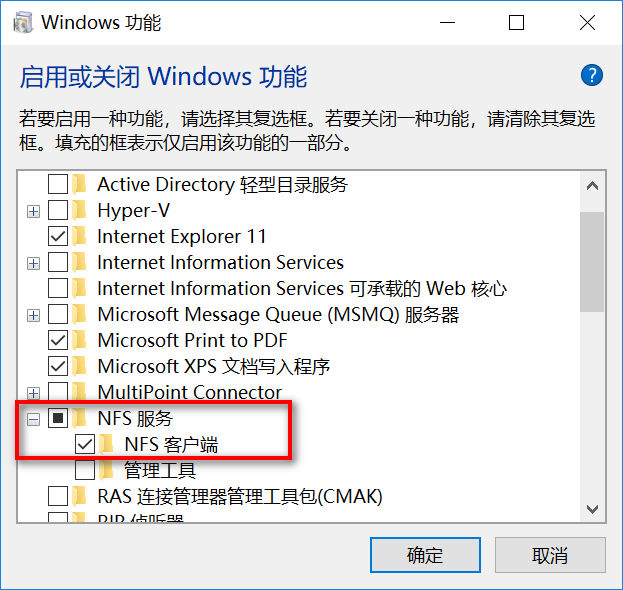
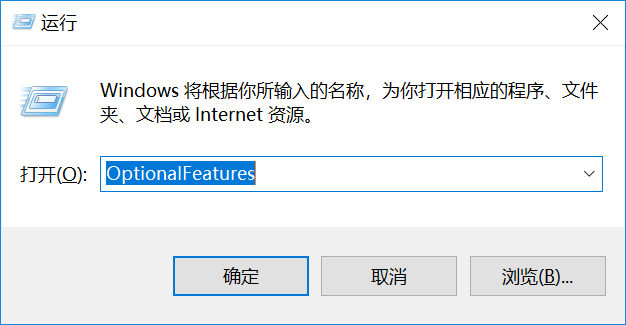
  1. 按「Win+R」输入「OptionalFeatures」,勾选「NFS服务」中的「NFS客户端」。

  2. 查看 nfs server 共享的目录

    showmount -e <nfs_server_ip>
    

  3. 挂载(以匿名模式)

mount \\<nfs_server_ip>\<nfs_dir> <local_nfs_volume>

  1. 卸载

    umount <local_nfs_volume>
    

Read More

jekyll blog series

本文参考 Youtube 频道:代码真香

jekyll 快速入门

Jekyll 是一个静态站点生成器,它是 GitHub 创始人创造的,被非常多的极客使用,阮一峰的博客也是用它搭建。Jekyll 会根据网页源码生成静态文件,包括 html,css,js等。它提供了模板、变量、插件等功能,所以实际上可以用来编写整个网站。但是和WordPress又有很大的不同,原因是jekyll只是一个生成静态网页的工具,不需要数据库支持。它使用 Ruby 编写,通过 Markdown 和 Liquid 模板生成内容。

其他主流的博客搭建方式:

  • WordPress
  • typecho
  • Tale
  • Hexo
  • Hugo

特点:

  • 简单
  • 静态
  • 对 Github 支持友好
  • 博客支持

规划:

  1. 快速在本地搭建博客
  2. 将博客部署到可访问的域名
  3. 常用插件和配置
  4. Liquid 模板语法

在本地搭建博客

1. 安装(on MacOS)

brew install ruby
sudo gem install jekyll
sudo gem install jekyll bundler

Gem 安装不上或很慢怎么办?

更换 gem 的源:

gem sources --add https://gems.ruby-china.org/ --remove https://rubygems.org/

2. 创建博客

创建博客目录:

jekyll new myblog
cd myblog

安装依赖:

sudo bundle install
bundle exec jekyll serve

运行本地博客服务:


默认从 127.0.0.1:4000 访问。

一些文件和目录的作用:

  • _config.yml:是最重要的配置文件。
  • _post:展示的博客文章。
  • _drafts:草稿,不会展示。
  • _site:生成的静态网站内容。

3. 使用别人的主题

  1. 克隆主题。
  2. 安装依赖。
  3. 更换文章。
  4. 运行和部署。
Read More

TCP 的三次握手和四次挥手

前言

跟 UDP 相比,TCP 是面向连接的、可靠的协议。

两个进程在使用 TCP 传输数据之前必须先使用「三次握手」来建立连接。完成数据交换后,经过「四次挥手」来关闭这个连接。

本文的目的是分析「TCP连接的建立和终止」,可能我的理解是片面的,后续我会不断更新我的理解。

在下面的分析中,我们假设有两个角色:client 和 server。

1. 建立连接

1.1 直觉

为了建立可靠的连接,就不能像 UDP 那样,消息发送后就撒手不管。通信的双方必须要确认自己发送的消息对方接收到了才行。那么如何做到这一点呢?一种可行的方法是:发送方在发送的数据中加上一个「标记」,接收方收到数据后要回送一个「应答」,发送方收到接收方的应答后才会认为数据发送成功。

接下来思考一个更加现实的问题:怎样建立 client 和 server 之间的可靠连接呢?

根据上面的分析,自然而然的就想到一种方法:

  1. client 跟 server 说:「我要跟你建立连接」;
  2. server 回复 client :「我准备好了,来吧」;
  3. server 紧接着又问 client:「我准备好了,那你呢?不会放我鸽子吧?」;
  4. client 又回复说:「放心吧,我也准备好了」。

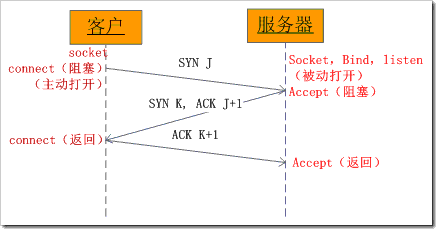
假设发送数据的时候会给数据加上一个数字 id 做为标记,收到标记为 id+1 的数据才能确认数据发送成功。所以上面的过程可以这样描述为下图的过程:

  1. client 发送一条数据到 server,标记为 10;
  2. server 回复一条数据,标记为11,client 收到 11 后就知道 server 准备好了;
  3. server 向 client 发送一条数据,标记为 20;
  4. client 回复一条数据,标记为 21,server 收到 21 后也知道 client 准备好了。
  5. 至此,双方都确认对方已经准备好进行数据传输了,意味着连接建立成功了。

在这个过程中,数据「10」和「11」代表的是请求,「11」和「21」代表的是应答

1.2 TCP 的做法

TCP 建立连接是经过三次握手,而上面是通过四次握手建立连接,能不能少握一次呢?减少一次通信肯定能快一点建立连接。回头再看看,这四次握手有没有多余的呢?

从数据传输方向上来看,第二次和第三次都是 server 向 client 发送数据,而且在这之间 server 没有任何其他的数据向 client 传输,那么我们可以将他们合二为一,这样就只剩三次握手了。从四次到三次,提高了数据传输的效率,缩短了建立连接的时间。

这样的话,当 server 将带有请求 11 和应答 20 的数据发送给 client 的时候,client 如何知道 11 和 20 各自的含义呢?其实很简单,给他们取个名字就行了。如下图,用 SYN 标记发送的数据的序号,ACK 用来标记对收到的 SYN 的确认。

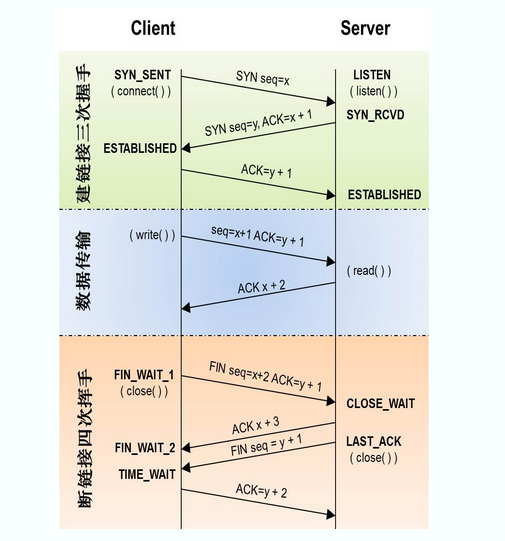
再来一个更加详细的图(注意图中 connect 函数和 accept 函数何时返回):

连接终止

TCP 连接终止使用四次挥手,这里假设 client 主动关闭连接。

  1. 首先,client 发送 FIN 给 server 说:「我要关闭连接了,不会再接受数据了」;
  2. server 回复 client 对 FIN 的 ACK:「好的,我知道了,等我处理完数据我也关闭连接」;
  3. server 发送 FIN 给 client:「我也要关闭了,收到消息请回复」;
  4. client:「好的,我知道了,你可以关闭了」。

问题又来了,为什么第二次和第三次不能合二为一呢?

虽然第二次和第三次都是 server 向 client 传输数据,但是 TCP 是全双工的,一方关闭不影响另一方的数据传输,在这两次传输之间 server 可能需要继续等待 client 发出的尚未收到的数据或处理之前收到的数据,如果硬要合到一起,对 client 而言,这个过程可能要阻塞一段时间,性能就会下降。

Read More

Windows 10 交换 Caps 和左 Ctrl 按键

MacBook Pro

之前一直使用 MacBook Pro 办公,而且读研的时候折腾过一阵 Emacs。出于按键习惯的原因,我把 Caps 按键和 Ctrl 按键交换了,感觉效率确实高了一些。久而久之就习惯了这种按键方式。

在 MacBook Pro 上更换的方法是:

  1. 「系统偏好设置」==>「键盘」==>「修饰键」(右下角);
  2. 大写锁定键:选择 Control;Control 键:选择大写锁定键。

FILCO MINILA

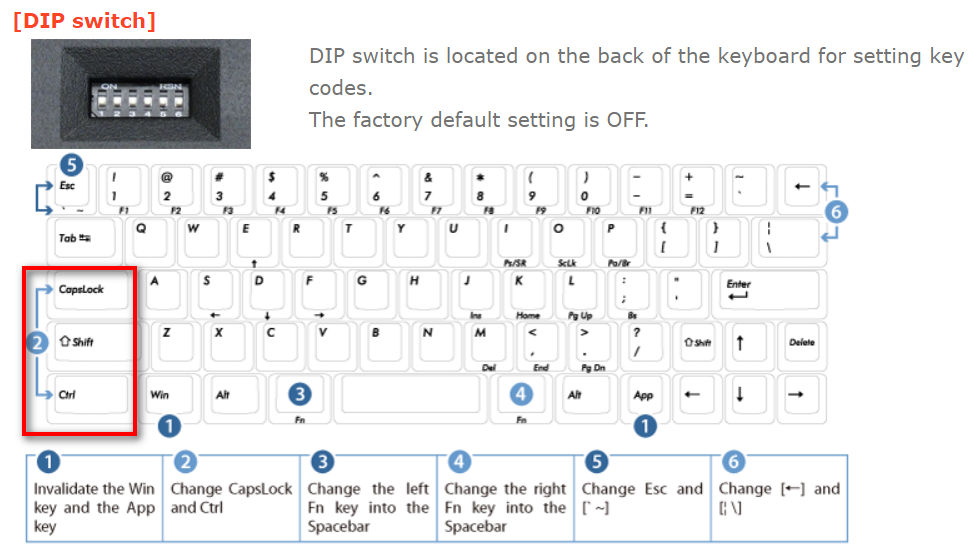
后来我入手了梦寐以求的 FILCO 出品的 Majestouch MINILA,不仅手感好,还支持 DIP 开关,掰一下开关就实现 Caps 键和 Ctrl 键的交换了!

filco_minila_dip

Windows 10

老板人好,上个月给配了一台 Surface Laptop,16 GB 内存加 512 GB SSD。笔记本的配置还是比较爽的,但是按键不知道咋改……像我这种有强迫症、爱折腾的程序猿怎么能忍,于是我习惯性的去找 Google 大哥帮忙。找到一个感觉很原始但是确实有效的方法(on Windows 10):

  1. 按键:「Win + R」;

  2. 输入:「regedit」,打开注册表;

  3. 依次进入:HKEY_LOCAL_MACHINE ==> System ==> CurrentControlSet ==> Control ==> KeyBoard Layout;

  4. 右击「KeyBoard Layout」,依次选择「新建」=> 「二进制值」;

  5. 将「新值 #1」重命名为 Scancode Map;

  6. 右击 「Scancode Map」,选择「修改」;

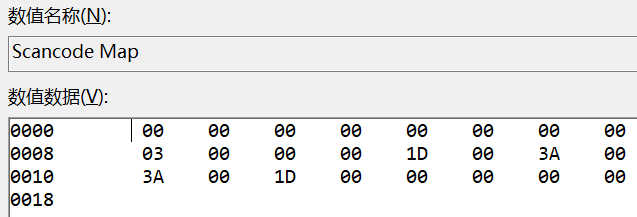
  7. 输入如下值并保存:

    Scancode Map

  8. 重启生效。

参考链接

  1. Majestouch MINILA [US67key / Red switch]
  2. Windows下交换Capslock和左Ctrl的方法 - 江南消夏的博客 - CSDN博客
Read More

通过一个小测试简单理解http的request和response

通俗讲 HTTP 协议就是在网络上传输(发布和接受)HTML 的协议,用于浏览器和服务器的通信。

下面进行一个小测试:

  • 客户端:MacBook Pro(192.168.0.103)的 Chrome 浏览器。

  • 服务端:Windows(192.168.0.105)上的 TCP 调试工具。

步骤

  1. 服务器要先开启,工作模式为:「TCP 服务器」,端口设置为:「8888」。

  2. 浏览器地址栏输入:「192.168.0.105:8888」。

  3. 服务端接收到请求:

    GET / HTTP/1.1
    Host: 192.168.0.105:8888
    Connection: keep-alive
    Upgrade-Insecure-Requests: 1
    User-Agent: Mozilla/5.0 (Macintosh; Intel Mac OS X 10_14_1) AppleWebKit/537.36 (KHTML, like Gecko) Chrome/70.0.3538.102 Safari/537.36
    Accept: text/html,application/xhtml+xml,application/xml;q=0.9,image/webp,image/apng,*/*;q=0.8
    Accept-Encoding: gzip, deflate
    Accept-Language: zh-CN,zh;q=0.9
    
  4. 在服务端的发送信息窗口输入:

    HTTP/1.1 200 ok
       
    <h1>Hello World</h1>
    
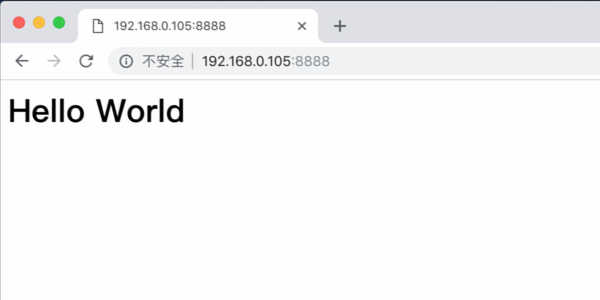
  5. 客户端显示如下页面:

    http_response

Read More

Welcome to Jekyll!

You’ll find this post in your _posts directory. Go ahead and edit it and re-build the site to see your changes. You can rebuild the site in many different ways, but the most common way is to run jekyll serve, which launches a web server and auto-regenerates your site when a file is updated.

To add new posts, simply add a file in the _posts directory that follows the convention YYYY-MM-DD-name-of-post.ext and includes the necessary front matter. Take a look at the source for this post to get an idea about how it works.

Jekyll also offers powerful support for code snippets:

def print_hi(name)
  puts "Hi, #{name}"
end
print_hi('Tom')
#=> prints 'Hi, Tom' to STDOUT.

Check out the Jekyll docs for more info on how to get the most out of Jekyll. File all bugs/feature requests at Jekyll’s GitHub repo. If you have questions, you can ask them on Jekyll Talk.

Read More

TCP vs UDP

Table of Contents

  1. differences between TCP and UDP

differences between TCP and UDP

  TCP UDP
connection connection-oriented connectionless
reliability yes no
speed slower faster
header size 20 bytes 8 bytes
ordering rearrange packets in the order specified no order
streaming of data byte stream, buffered entire message, sent once
used by other protocols HTTP, HTTPS, FTP, SMTP, Telnet DNS, DHCP, TFTP, SNMP, RIP
occasion require high reliability, large amount of data need fast, efficient transmission, small amount of data
Read More

http status code

Table of Contents

  1. 1xx Informational
    1. 100 Continue
    2. 101 Switching Protocols
  2. 2xx Successful
    1. 200 Ok
    2. 201 Created
    3. 202 Accepted
    4. 203 Non-Authoritative Information
    5. 204 No Content
    6. 205 Reset Content
    7. 206 Partial Content
  3. 3xx Redirection
    1. 300 Multiple Choices
    2. 301 Moved Permanently
    3. 302 Found
    4. 303 See Other
    5. 304 Not Modified
    6. 305 Use Proxy
    7. 307 Temporary Redirect
    8. 308 Permanent Redirect
  4. 4xx Client Error
    1. 400 Bad Request
    2. 401 Unauthorized
    3. 402 Payment Required
    4. 403 Forbidden
    5. 404 Not Found
    6. 405 Method Not Allowed
    7. 406 Not Acceptable
    8. 407 Proxy Authentication Required
    9. 408 Request Timeout
    10. 409 Conflict
    11. 410 Gone
    12. 411 Length Required
    13. 412 Precondition Failed
    14. 413 Request Entity Too Large
    15. 414 Request-URI Too Long
    16. 415 Unsupported Media Type
    17. 416 Requested Range Not Satisfiable
    18. 417 Expectation Failed
  5. 5xx Server Error
    1. 500 Internal Server Error
    2. 501 Not Implemented
    3. 502 Bad Gateway
    4. 503 Service Unavailable
    5. 504 Gateway Timeout
    6. 505 HTTP Version Not Supported

1xx Informational

代表请求已被接受,需要继续处理。

100 Continue

服务器已经接收到请求头,并且客户端应继续发送请求主体,或者如果请求已经完成,忽略这个响应。

101 Switching Protocols

服务器已经理解了客户端的请求,并将通过Upgrade消息头通知客户端采用不同的协议来完成这个请求。

2xx Successful

200 Ok

请求已成功,请求所希望的响应头或数据体将随此响应返回。

201 Created

请求已经被实现,而且有一个新的资源已经依据请求的需要而创建,且其URI已经随Location头信息返回。

202 Accepted

服务器已接受请求,但尚未处理。

203 Non-Authoritative Information

204 No Content

服务器成功处理了请求,没有返回任何内容。

205 Reset Content

服务器成功处理了请求,但没有返回任何内容。与204响应不同,此响应要求请求者重置文档视图。

206 Partial Content

服务器已经成功处理了部分GET请求。

3xx Redirection

300 Multiple Choices

被请求的资源有一系列可供选择的回馈信息,每个都有自己特定的地址和浏览器驱动的商议信息。用户或浏览器能够自行选择一个首选的地址进行重定向。

301 Moved Permanently

被请求的资源已永久移动到新位置,并且将来任何对此资源的引用都应该使用本响应返回的若干个URI之一。

302 Found

要求客户端执行临时重定向。

303 See Other

对应当前请求的响应可以在另一个URI上被找到。

304 Not Modified

表示资源未被修改,因为请求头指定的版本If-Modified-Since或If-None-Match。在这种情况下,由于客户端仍然具有以前下载的副本,因此不需要重新传输资源。

305 Use Proxy

被请求的资源必须通过指定的代理才能被访问。

307 Temporary Redirect

在这种情况下,请求应该与另一个URI重复,但后续的请求应仍使用原始的URI。

308 Permanent Redirect

请求和所有将来的请求应该使用另一个URI重复。307和308重复302和301的行为,但不允许HTTP方法更改。

4xx Client Error

400 Bad Request

由于明显的客户端错误(例如,格式错误的请求语法,太大的大小,无效的请求消息或欺骗性路由请求),服务器不能或不会处理该请求。

401 Unauthorized

用户没有必要的凭据。

402 Payment Required

403 Forbidden

服务器已经理解请求,但是拒绝执行它。

404 Not Found

请求失败,请求所希望得到的资源未被在服务器上发现,但允许用户的后续请求。

405 Method Not Allowed

请求行中指定的请求方法不能被用于请求相应的资源。

406 Not Acceptable

请求的资源的内容特性无法满足请求头中的条件,因而无法生成响应实体,该请求不可接受。

407 Proxy Authentication Required

客户端必须在代理服务器上进行身份验证。

408 Request Timeout

请求超时。

409 Conflict

表示因为请求存在冲突无法处理该请求,例如多个同步更新之间的编辑冲突。

410 Gone

表示所请求的资源不再可用,将不再可用。

411 Length Required

服务器拒绝在没有定义Content-Length头的情况下接受请求。

412 Precondition Failed

服务器在验证在请求的头字段中给出先决条件时,没能满足其中的一个或多个。

413 Request Entity Too Large

服务器拒绝处理当前请求,因为该请求提交的实体数据大小超过了服务器愿意或者能够处理的范围。

414 Request-URI Too Long

请求的URI长度超过了服务器能够解释的长度,因此服务器拒绝对该请求提供服务。

415 Unsupported Media Type

对于当前请求的方法和所请求的资源,请求中提交的互联网媒体类型并不是服务器中所支持的格式,因此请求被拒绝。

416 Requested Range Not Satisfiable

客户端已经要求文件的一部分(Byte serving),但服务器不能提供该部分。

417 Expectation Failed

在请求头Expect中指定的预期内容无法被服务器满足,或者这个服务器是一个代理服显的证据证明在当前路由的下一个节点上,Expect的内容无法被满足。

5xx Server Error

500 Internal Server Error

服务器遇到了一个未曾预料的状况,导致了它无法完成对请求的处理。

501 Not Implemented

服务器不支持当前请求所需要的某个功能。

502 Bad Gateway

作为网关或者代理工作的服务器尝试执行请求时,从上游服务器接收到无效的响应。

503 Service Unavailable

由于临时的服务器维护或者过载,服务器当前无法处理请求。这个状况是暂时的,并且将在一段时间以后恢复。

504 Gateway Timeout

作为网关或者代理工作的服务器尝试执行请求时,未能及时从上游服务器(URI标识出的服务器,例如HTTP、FTP、LDAP)或者辅助服务器(例如DNS)收到响应。

505 HTTP Version Not Supported

服务器不支持,或者拒绝支持在请求中使用的HTTP版本。

Read More

sed learning notes

[TOC]

sed notes

what is sed?

sed is a stream editor. A stream editor is used to perform basic text transformations on an input stream (a file or input from a pipeline).

语法

sed OPTIONS... [SCRIPT] [INPUTFILE...]

选项

选项 解释
-f script-file 添加script-file到命令
-i [suffix] 就地编辑。suffix指定备份文件后缀名
-n/–quiet/ – slient slient
-e script 添加script到命令

基础

  • 命令结构:

    [address[, address]] instruction [argument-list]

    地址(address)

    类似于awk的范围模式。$表示最后一行。

    指令

指令 解释
a (append) append text after a line
c (change) change lines with text
d (delete) stop processing the current line, immediately start next cycle
i (insert) insert text before a line
N (next without write) add a newline to the pattern space, then append the next line of input to the pattern space
n (next) print the pattern space, then replace the pattern space with the next line of input
p (print) print the pattern space
q (quit) exit
r filename (read) read text of a file
s (substitute) format: s/regexp/replacement/[flags]
w filename (write) write the pattern space to filename

### 控制结构

符号 解释
! (NOT) not
{} 将一组指令括起来,用$;$将多条指令隔开
:label 标记一个位置,作为跳转目标
b [label] 无条件转移
t [label] 匹配成功则转移

### 暂存空间

符号 解释
g 将暂存空间的内容复制到模式空间中,模式空间中原来的内容丢失
G 将一个换行符和暂存空间中的内容append到模式空间中
h 将模式空间中的内容复制到暂存空间中,暂存空间中原来的内容丢失
H 将一个换行符和模式空间中的内容append到暂存空间中
x 交换模式空间和暂存空间中的内容

### regular expression extensions

symbol explanation
\w any “word” character (字母、数组、下划线)
\W any “non-word” character
\b a word boundary
\B every but on a word boundary
\s whitespace characters (空格、tab、暂存空间和模式空间中的回车)
\S non-whitespace characters
\< beginning of a word
\> end of a word
\` start of pattern space, different from ^
\’ end of pattern space, different from $
Read More

awk learning notes

AWK Learning Notes


What is awk?

An awk program is a sequence of patterns and actions that tell what to look for in the input data and what to do when it’s found.


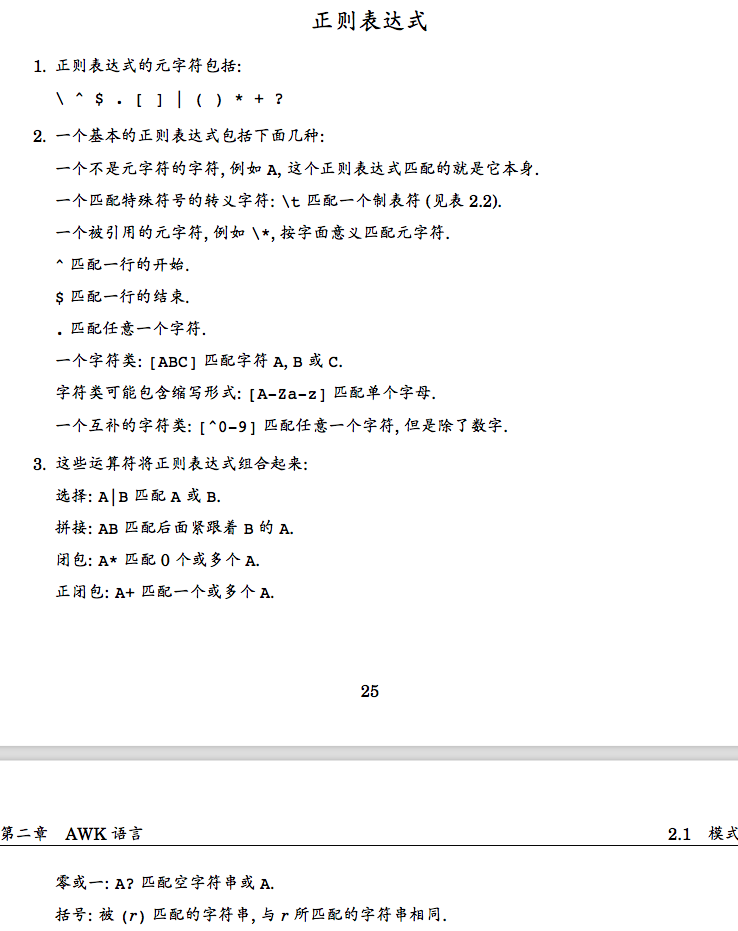
Patterns

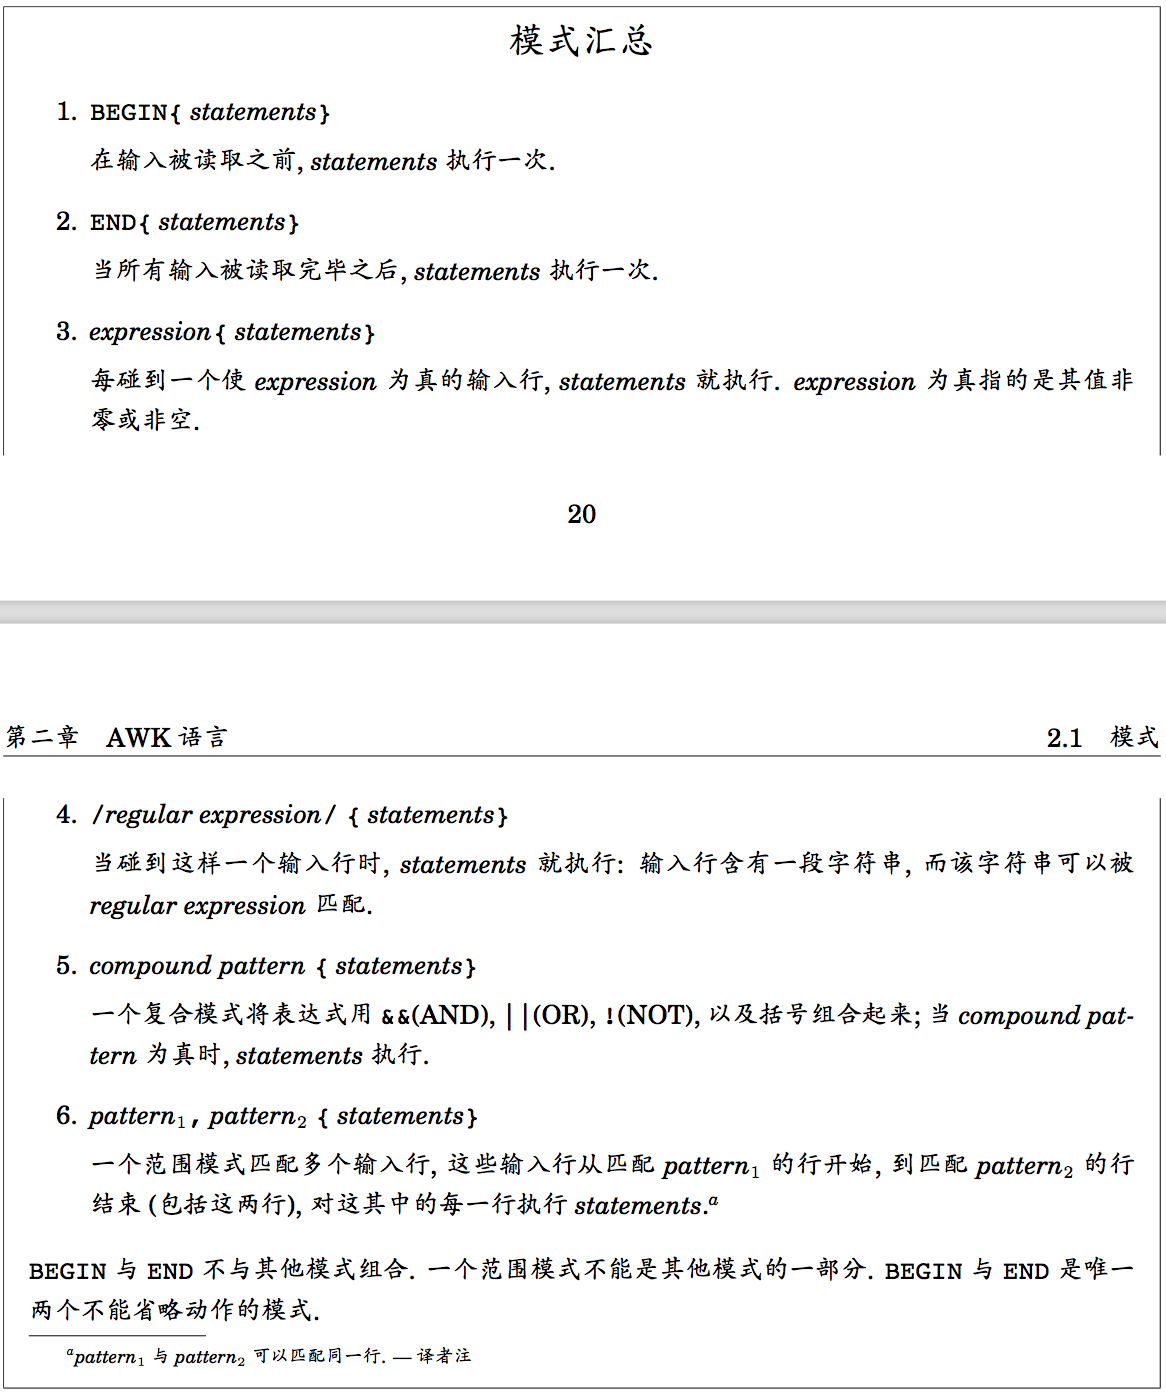
Summary of Patterns

000001

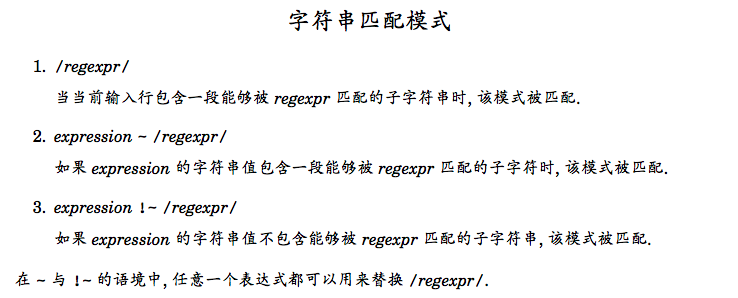
String-Matching Patterns

000002

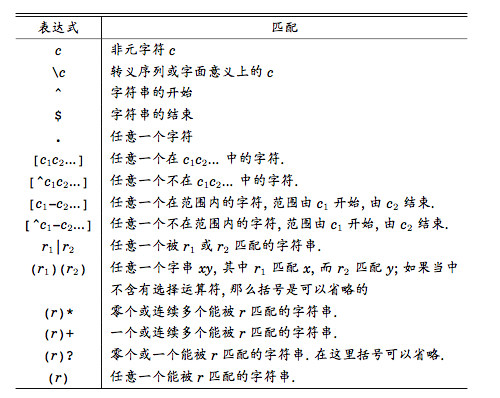
Regular Expression

000003

000004

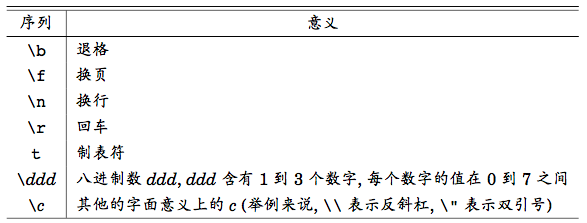
转义序列

000005

模式总结

000006


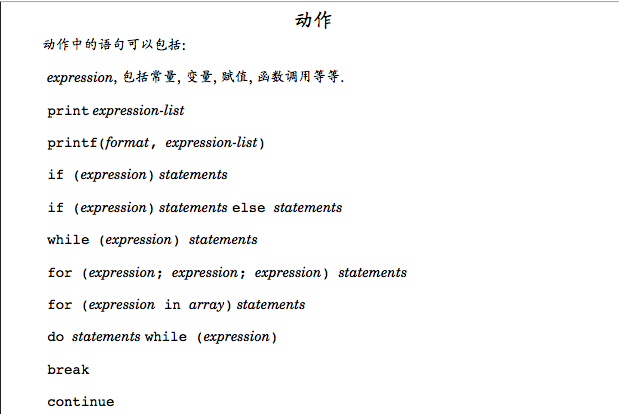
Actions

statements in actions

000007

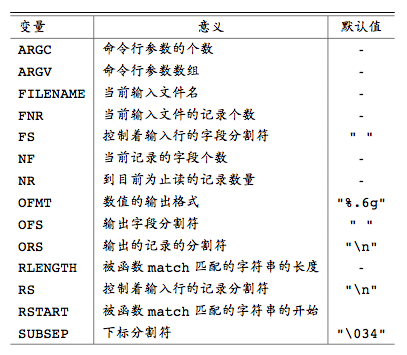
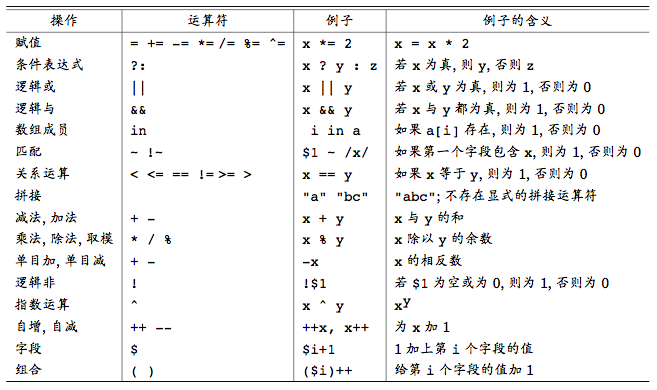
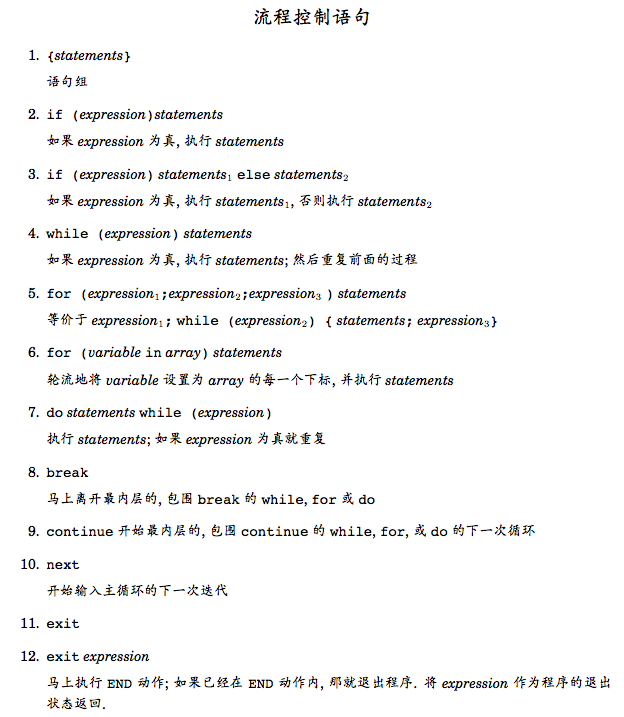
注意:for (expression in array) statements 中的expression是array的index而不是array的element

built-in variables

000008

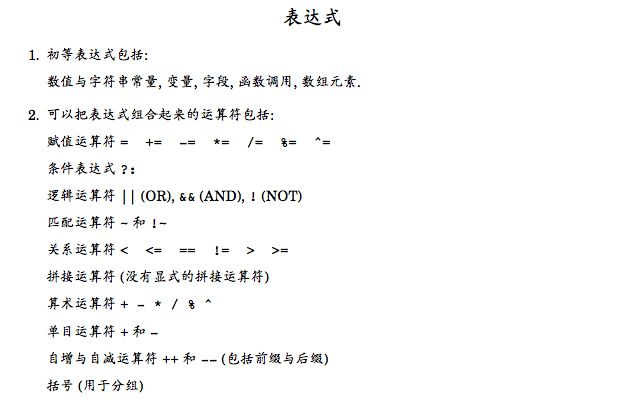
expressions

000009

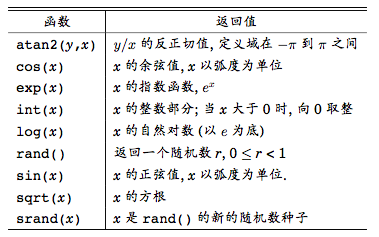
built-in arithmetic functions

000010

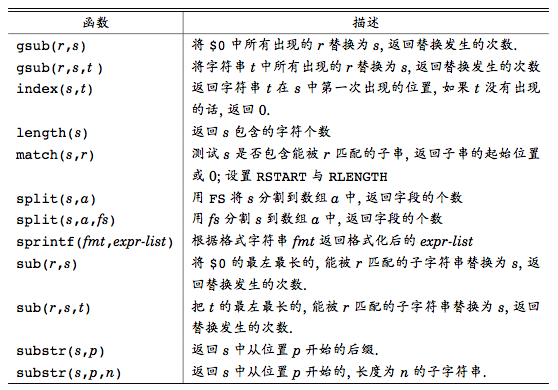
built-in string functions

000011

expression operators

000012

control-flow statements

000013

用户自定义函数

function name(parameter-list) {
  	statements
  	return result
}

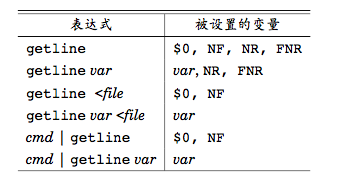
getline函数

000014

注:getline < filegetline var < file可以用在BEGIN中进行“预处理”(不会设置NR变量)。

Read More

install mesos on mnode

Table of Contents

  1. plan
  2. prerequisites
    1. 关闭防火墙(on all nodes)
    2. ssh免密登录(on all nodes)
    3. 如果之前装过mesos,需要清理一些目录(删除或修改)
  3. 配置master节点(mnode04)
    1. 添加mesos的yum源
    2. 安装mesos,marathon,zookeeper
    3. 配置zookeeper
    4. 配置mesos和marathon
    5. 启动mesos,marathon,zookeeper
    6. 检查配置
  4. 配置slave节点(mnode01, mnode02, mnode04)
    1. 添加mesos的yum源并安装mesos(mnode01, mnode02)
    2. 配置slave和master信息
    3. 启动slave
  5. 验证安装
    1. web ui
    2. 测试

plan

  • available nodes:
hostname ip address status
mnode01 10.2.152.21 slave
mnode02 10.2.152.22 slave
mnode04 10.2.152.24 master & slave

prerequisites

关闭防火墙(on all nodes)

systemctl stop firewalld && systemctl disable firewalld

ssh免密登录(on all nodes)

  • mnode01

    ssh-keygen -t rsa
    ssh-copy-id -i ~/.ssh/id_rsa.pub mnode02
    ssh-copy-id -i ~/.ssh/id_rsa.pub mnode04
    
  • mnode02

    ssh-keygen -t rsa
    ssh-copy-id -i ~/.ssh/id_rsa.pub mnode01
    ssh-copy-id -i ~/.ssh/id_rsa.pub mnode04
    
  • mnode04

    ssh-keygen -t rsa
    ssh-copy-id -i ~/.ssh/id_rsa.pub mnode01
    ssh-copy-id -i ~/.ssh/id_rsa.pub mnode02
    

如果之前装过mesos,需要清理一些目录(删除或修改)

/var/lib/mesos/
/var/lib/zookeeper/
/etc/mesos*/
/etc/zookeeper/
/etc/marathon/

配置master节点(mnode04)

添加mesos的yum源

rpm -Uvh http://repos.mesosphere.io/el/7/noarch/RPMS/mesosphere-el-repo-7-3.noarch.rpm 

安装mesos,marathon,zookeeper

yum -y install mesos marathon mesosphere-zookeeper

配置zookeeper

echo 4 > /var/lib/zookeeper/myid
vim /etc/zookeeper/conf/zoo.cfg
# 在最后添加 
# server.4 = 10.2.152.24:2888:3888
# 2888端口用于集群成员的信息交换
# 3888端口是在leader挂掉时用来选举新的leader用
vim /etc/mesos/zk
# 内容为:
# zk://10.2.152.24:2181/mesos
# 设置quorum的值(master节点数目除以2向上取整)
echo 1 > /etc/mesos-master/quorum

配置mesos和marathon

mkdir -p /etc/marathon/conf
echo 10.2.152.24 > /etc/mesos-master/hostname
echo 10.2.152.24 > /etc/marathon/conf/hostname
cp /etc/mesos/zk /etc/marathon/conf/master
cp /etc/mesos/zk /etc/marathon/conf/zk
sed -i 's|mesos|marathon|g' /etc/marathon/conf/zk

启动mesos,marathon,zookeeper

systemctl start zookeeper && systemctl start mesos-master && systemctl start marathon

检查配置

  • 主要配置内容:

    /var/lib/zookeeper/myid
    /etc/zookeeper/conf/zoo.cfg
    /etc/mesos/zk
    /etc/mesos-master/quorum
    /etc/mesos-master/hostname
    /etc/marathon/conf/hostname
    /etc/marathon/conf/master
    /etc/marathon/conf/zk
    

配置slave节点(mnode01, mnode02, mnode04)

添加mesos的yum源并安装mesos(mnode01, mnode02)

rpm -Uvh http://repos.mesosphere.io/el/7/noarch/RPMS/mesosphere-el-repo-7-3.noarch.rpm 
yum -y install mesos

配置slave和master信息

  • mnode01

    echo 10.2.152.21 > /etc/mesos-slave/hostname
    vim /etc/mesos/zk
    # 内容编辑为:
    # zk://10.2.152.24:2181/mesos
    
  • mnode02

    echo 10.2.152.22 > /etc/mesos-slave/hostname
    vim /etc/mesos/zk
    # 内容编辑为:
    # zk://10.2.152.24:2181/mesos
    
  • mnode04

    echo 10.2.152.24 > /etc/mesos-slave/hostname
    

启动slave

  • mnode01, mnode02 and mnode04

    systemctl start mesos-slave
    

验证安装

web ui

测试

  • on mnode04

    mesos-execute --master="10.2.152.24:5050" --name="cluster-test" --command="sleep 40"
    

    mesos的管理页面中会显示

Read More

create git remote repository and initiate it from local repository

Table of Contents

  1. create a remote repo
  2. initiate from local repository
  3. my shell script

create a remote repo

  • using the following command:

    curl -u '${user_name}' https://api.github.com/user/repos -d "{\"name\":\"${repo_name}\"}"
    
    • change ${user _name} to your github user name, and ${repo _name} to the repository name you want to create.

initiate from local repository

  • cd to the directory you want to initiate the remote repository with.
  • execute the following commands:

    touch README.md
    echo "# ${repo_name}" >> README.md
    git init
    git add .
    git commit -m "first commit"
    git remote add origin https://github.com/${user_name}/${repo_name}.git
    git push -u origin master
    

my shell script

  • this is my shell script git-create, I made it executable and added it’s path to my PATH environment variable for convenience:

    user_name='lightjameslyy'
    repo_name=$1
    test -z $repo_name && echo "Repo name required." 1>&2 && exit 1
        
    curl -u ${user_name} https://api.github.com/user/repos -d "{\"name\":\"${repo_name}\"}"
        
    touch README.md
    echo "# ${repo_name}" >> README.md
    git init
    git add .
    git commit -m "first commit"
    git remote add origin https://github.com/${user_name}/${repo_name}.git
    git push -u origin master
    
Read More

file compression on Unix and Linux

1. gzip Compression

​ Typically, gzip files are sotred with a .gz extension.

1.1. Compress files with gzip :

gzip sourcefile

​ This wil compress the file and change the name to sourcefile.gz.

1.2. Recursively compress an entire directory

gzip -r directory1

1.3. list info of the compressed file

gzip -l test.gz

1.4. Adjust the compression optimization

​ From -1(–fast) to -9(–best):

gzip -9 sourcefile

1.5. Decompress a .gz file

gzip -d test.gz

​ or

gunzip test.gz

2. bzip2 Compression

​ Files compressed with bzip2 are generally given a .bz2 file extension.

2.1. Compress files with bz2

bzip2 testfile

​ This will compress the file and give it the name testfile.bz2.

2.2. Numbered flags (different from that of gzip)

​ The number represents the block size that utility manages to implement its compression.

bzip2 -9 testfile

​ The default behavior is the -9 flag.

2.3. Decompress a .bz2 file

bzip2 -d testfile.bz2

3. xz Compression

3.1. Compress files with xz

xz testfile

​ This will process the file and produce a file called file.xz.

3.2. List statistics about the compression of the file

xz -l testfile.xz

3.3. Decompress a .xz file

xz -d testfile.xz

4. Using tar archiving with compression

4.1. Using tar with gzip

4.1.1. compress

tar czvf test.tar.gz directory1

4.1.2. peek inside

tar tzvf test.tar.gz

4.1.3. decompress

tar xzvf test.tar.gz

4.2. Using tar with bzip2

​ To use archiving with bzip2, you can replace the -z flag, which is gzip-specific, with the -j flag.

4.2.1. compress

tar cjvf test.tar.bz2 directory1

4.2.2. peek inside

tar tjvf test.tar.bz2

4.2.3. decompress

tar xjvf teat.tar.bz2

4.3. Using tar with xz

​ Any remotely recent versions of tar have added similar functionality for xz compression. These follow the exact same format using the -J flag.

4.3.1. compress

tar cJvf test.tar.xz directory1

4.3.2. peek inside

tar tJvf test.tar.xz

4.3.3. decompress

tar xJvf test.tar.xz
Read More

show hide hidden files on mac os x

1. show hidden files in finder

open terminal and type in the following commands:

> defaults write com.apple.finder AppleShowAllFiles YES
> killall Finder

then relaunch Finder, the hidden files should be visible.

2. hide hidden files in finder

open terminal and type in the following commands:

> defaults write com.apple.finder AppleShowAllFiles NO 
> killall Finder

then relaunch Finder, the hidden files should be invisible.

Read More

Qt 5.5.1 static compiling

1. Problem

进行Qt开发时,程序写好后在本机能运行,但是打包的.exe文件在没有安装Qt的机器上不能运行。原因:因为采用了动态编译,一起打包的dll文件都是动态库。解决方法是采用静态编译。

2. Solution

言归正传,下面就是我静态编译Qt的过程(我使用的版本是Qt5.5.1)。

1) 确保已经安装了Qt 5.5.1。
2) 下载Qt 5.5.1的源码:http://download.qt.io/archive/qt/5.5/5.5.1/single/ 。
3) 安装python。
4) 把源码解压到C盘(我的路径是C:\qt-everywhere-opensource-src-5.5.1)。编辑C:\qt-everywhere-opensource-src-5.5.1\qtbase\mkspecs\win32-g++\qmake.conf,找到QMAKE_LFLAGS和QMAKE_LFLAGS_DLL,后面赋值为 –static:

QMAKE_LFLAGS = -static  
QMAKE_LFLAGS_DLL = -static

保存,退出。
5) 打开终端:windows键==>all apps==>Qt 5.5.1==>Qt 5.5.1 for Desktop (MinGW 4.9.2 32 bit),切换路径到C:\qt-everywhere-opensource-src-5.5.1。
6) configure:

configure -confirm-license -opensource -platform win32-g++ -release -static -ltcg -prefix "C:\Qtstatic" -qt-sql-sqlite -qt-sql-odbc -plugin-sql-sqlite -plugin-sql-odbc -qt-zlib -qt-libpng -qt-libjpeg -opengl desktop -no-qml-debug -nomake tests -nomake examples -skip qtwebkit -qt-pcre -no-compile-examples  

(C:\Qtstatic为安装路径,可自定义)
7) mingw32-make
8) mingw32-make install
注:make和make install 需要的时间较多,可能要3到4个小时
9) 添加编译选项 打开QtCreator==>Tools==>options==>build&run==>QtVersions==>add==>选择C:\Qtstatic\bin\qmake.exe==>apply
10)done^_^

Read More

install gcc 5.3.0 on centos7

1.Preparations

  • operating system: CentOS 7 64bit
  • old gcc: gcc 4.8.2
  • source packages: gcc-5.3.0.tar.gz gmp-6.1.0.tar.bz2 mpc-1.0.3.tar.gz mpfr-3.1.3.tar.gz

2.Unzip

change to an appropriate directory (mine is /usr/local) and unzip the 4 packages:
tar -jxvf gmp-6.1.0.tar.bz2
tar -zxvf mpfr-3.1.3.tar.gz
tar -zxvf mpc-1.0.3.tar.gz
tar -zxvf gcc-5.3.0.tar.gz

3.Install

3.1.install gmp

> cd /usr/local/gmp-6.1.0
> ./configure
> make -j2
> make install -j2  

NOTICE:
(1) If there are errors such as “Permission denied…“, you need to switch to super user and repeat the process.
(2) The header and library genetated by gmp should already be located under /usr/local/include and /usr/local/lib.

3.2.install mpfr

> cd /usr/local/mpfr-3.1.3
> ./configure --with-gmp-include=/usr/local/include --with-gmp-lib=/usr/local/lib
> make -j2
> make install -j2

3.3.install mpc

> cd /usr/local/mpc-1.0.3
> ./configure
> make -j2
> make install -j2
> export LD_LIBRARY_PATH=$LD_LIBRARY_PATH:/usr/local/lib

NOTICE:
Don’t forget to change the environment variable $LD_LIBRARY_PATH which is necessary for compiling gcc later.

3.4.install gcc

> cd /usr/local/gcc-5.3.0
> mkdir build
> cd build
> ../configure --prefix=/usr/local/gcc --enable-threads=posix --disable-checking --enable-languages=c,c++ --disable-multilib --with-gmp=/usr/local/lib --with-mpfr=/usr/local/lib --with-mpc=/usr/local/lib
> make -j2
> make install -j2

NOTICE:
while make, I have the following errors:

...[s-attrtab]... 
...[all-stage1-gcc]...
...[stage1-bubble]...

this means you need to add swap partition, I made it by editing /etc/sysctl.conf
changing

vm.swappiness = 0

to

vm.swappiness = 60

then restart the operating system, continue from make -j2.

4.Remove old version

> yum remove gcc
> yum remove gcc-c++ 
> updatedb

5.Link to new version

> cd /usr/bin 
> ln -s /usr/local/gcc/bin/gcc gcc 
> ln -s /usr/local/gcc/bin/g++ g++

6.Add man help

> vim /etc/man_db.conf   add entry: ``` MANDATORY_MANPATH                       /usr/local/gcc/share/man ``` save and exit.

7.Check

> gcc -v

see whether the version is 5.3.0.

Read More

beginning markdown

Beginning Markdown

I started my hexo blog last year, and recently I get down to adding content frequently. So, I begin with learning besic markdown. The following tips are from http://www.markdowntutorial.com/.

1. Italics and Bold

To make a phrase italic in Markdown, you can surround words with an underscore ( _ ).Similarly, to make phrases bold in Markdown, you can surround words with two asterisks ( ** ).

for example:

italic:
_this_ ==> this

bold:
**this** ==> this

italic and bold:
**_this_** ==> this

2. headers

Header one

Header two

Header three

Header four

Header five
Header six

You can’t really make a header bold, but you can italicize certain words.for example:

##Header _two_

Header two

To create an inline link, you wrap the link text in brackets ( [ ] ), and then you wrap the link in parenthesis ( ( ) ).

####The Latest News from [the BBC](www.bbc.com/news) is shown as below:

The Latest News from the BBC

The other link type is called a reference link. As the name implies, the link is actually a reference to another place in the document.

Do you want to [see something fun][a fun place]?
Well, do I have [the website for you][another fun place]!
[a fun place]: www.zombo.com
[another fun place]: www.stumbleupon.com

is shown as below:

Do you want to see something fun?

Well, do I have the website for you!

4. Images

4.1. inline image

Images also have two styles, just like links. To create an inline image, you’ll use the same syntax as an inline link.

![A representation of Octdrey Catburn](http://octodex.github.com/images/octdrey-catburn.jpg) is shown as below: A representation of Octdrey Catburn

4.2. refenence image

For a reference image, you’ll follow the same pattern as a reference link. You’ll precede the Markdown with an exclamation point, then provide two brackets for the alt text, and then two more for the image tag. At the bottom of your Markdown page, you’ll define an image for the tag.

![The first father][First Father]

![The second first father][Second Father]

[First Father]: http://octodex.github.com/images/founding-father.jpg
[Second Father]: http://octodex.github.com/images/foundingfather_v2.png

is shown as below:

The first father

The second first father

5. Blockquotes

A blockquote is a sentence or paragraph that’s been specially formatted to draw attention to the reader. To create a block quote, all you have to do is preface a line with the “greater than” caret (>). For example:

> "Her eyes had called him and his soul had leaped at the call. To live, to err, to fall, to triumph, to recreate life out of life!"

“Her eyes had called him and his soul had leaped at the call. To live, to err, to fall, to triumph, to recreate life out of life!”

You can also place a caret character on each line of the quote. This is particularly useful if your quote spans multiple paragraphs. For example:

> —Of whom are you speaking? Stephen asked at length.
>
> Cranly did not answer.

—Of whom are you speaking? Stephen asked at length.

Cranly did not answer.

6. Lists

6.1. unordered list

To create an unordered list, you’ll want to preface each item in the list with an asterisk ( * ). Each list item also gets its own line. For example, a grocery list in Markdown might look like this:

* Milk
* Eggs
* Salmon
* Butter
  • Milk
  • Eggs
  • Salmon
  • Butter

6.2. ordered list

An ordered list is prefaced with numbers, instead of asterisks. Take a look at this recipe:

1. Crack three eggs over a bowl
2. Pour a gallon of milk into the bowl
3. Rub the salmon vigorously with butter
4. Drop the salmon into the egg-milk bowl
  1. Crack three eggs over a bowl
  2. Pour a gallon of milk into the bowl
  3. Rub the salmon vigorously with butter
  4. Drop the salmon into the egg-milk bowl

6.3. more depth

To make a list with more depth, or, to nest one list within another, all you have to do is to remember to indent each asterisk one space more than the preceding item. For example:

* Tintin
 * A reporter
 * Has poofy orange hair
 * Friends with the world's most awesome dog
* Haddock
 * A sea captain
 * Has a fantastic beard
 * Loves whiskey
   * Possibly also scotch?
  • Tintin
  • A reporter
  • Has poofy orange hair
  • Friends with the world’s most awesome dog
  • Haddock
  • A sea captain
  • Has a fantastic beard
  • Loves whiskey
    • Possibly also scotch?

6.4. a paragraph example

1. Crack three eggs over a bowl.

 Now, you're going to want to crack the eggs in such a way that you don't make a mess.

 If you _do_ make a mess, use a towel to clean it up!

2. Pour a gallon of milk into the bowl.

 Basically, take the same guidance as above: don't be messy, but if you are, clean it up!

3. Rub the salmon vigorously with butter.

   By "vigorous," we mean a strictly vertical motion. Julia Child once quipped:
   > Up and down and all around, that's how butter on salmon goes.
4. Drop the salmon into the egg-milk bowl.

   Here are some techniques on salmon-dropping:

   * Make sure no trout or children are present
   * Use both hands
   * Always have a towel nearby in case of messes
  1. Crack three eggs over a bowl.

Now, you’re going to want to crack the eggs in such a way that you don’t make a mess.

If you do make a mess, use a towel to clean it up!

  1. Pour a gallon of milk into the bowl.

Basically, take the same guidance as above: don’t be messy, but if you are, clean it up!

  1. Rub the salmon vigorously with butter.

    By “vigorous,” we mean a strictly vertical motion. Julia Child once quipped:

    Up and down and all around, that’s how butter on salmon goes.

  2. Drop the salmon into the egg-milk bowl.

    Here are some techniques on salmon-dropping:

    • Make sure no trout or children are present
    • Use both hands
    • Always have a towel nearby in case of messes

7. Paragraphs

7.1. hard break

Do I contradict myself?

Very well then I contradict myself,

(I am large, I contain multitudes.)

is shown as below:

Do I contradict myself?

Very well then I contradict myself,

(I am large, I contain multitudes.)

7.2. soft break

Do I contradict myself?··
Very well then I contradict myself,··
(I am large, I contain multitudes.)

is shown as below(a dot represents a space):

Do I contradict myself?
Very well then I contradict myself,
(I am large, I contain multitudes.)
Read More

You're up and running!

Next you can update your site name, avatar and other options using the _config.yml file in the root of your repository (shown below).

Read More